
Apache Guacamole is a free and open source web application which lets you access your dashboard from anywhere using a modern web browser. It is a clientless remote desktop gateway which only requires Guacamole installed on a server and a web browser supporting HTML5.
Guacamole is the best way to keep multiple instances accessible over the internet. Once you add an instance to Guacamole, you don’t need to remember the password as it can securely store the credentials. It also lets you share the desktops among other users in a group. Guacamole supports multiple connection methods such as SSH, Telnet, VNC, and RDP.
In this tutorial, we will install Apache Guacamole on a Azure with an Ubuntu 16.04 instance.
Guacamole Server
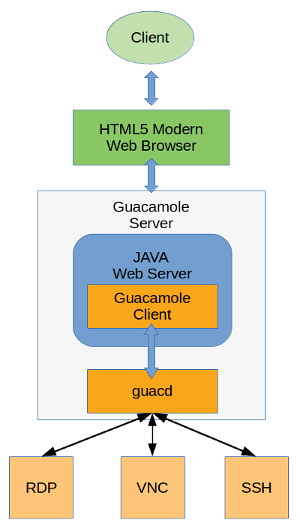
Guacamole server consists of the native server-side libraries required to connect to the server and the guacd tool. guacd is the Guacamole proxy daemon which accepts the user’s connections and connects to the remote desktop on their behalf. Given below is the architecture of Guacamole System.
Note: It is required to compile and install the Guacamole server on the host machine, installing the binary is not possible for Guacamole server
Server Install
Download the Guacamole server source code files into the temporary directory.
cd /tmp
wget "http://apache.org/dyn/closer.cgi?action=download&filename=guacamole/0.9.14/source/guacamole-server-0.9.14.tar.gz" -O guacamole-server-0.9.14.tar.gz
Extract the source code archive.
tar xf guacamole-server-0.9.*.tar.gz
cd guacamole-server-0.9.*
Compile and install the source code.
./configure --with-init-dir=/etc/init.d
makemake install
The installation will also set up an init script which can be used to manage the guacd daemon. Create the necessary links and cache for the shared libraries.
ldconfigGuacamole server is now installed on your instance. Start the Guacamole proxy daemon and enable it to automatically start at boot time using the following commands.
systemctl enable guacd
systemctl start guacd
You can check the status of the service by running.
systemctl status guacdGuacamole Client
Guacamole client is Java based web application which contains all the Java and JavaScript code required for running the user interface of Guacamole. It ultimately creates a web application which connects to the guacd daemon running in the background using Guacamole protocol. In the foreground, it renders the remote desktop interface using HTML5 on the web browser to the authorized users.
Unlike Guacamole server, Guacamole client is not required to be compiled and install from source. Cross-platform Guacamole client binary is available to download and install.
Apache Tomcat Install
Guacamole binary requires a Java web server to run. In this tutorial, we will install Apache Tomcat 7 or 8 to run the Guacamole binary file.
Install Java 8 runtime on your server, installing JDK is not required since we do not need to compile any Java code.
yum -y install java-1.8.0-openjdk.x86_64Create a new group and user for Tomcat installation. Running Tomcat server with an unprivileged user is recommended for security reasons.
groupadd tomcat
useradd -M -s /bin/nologin -g tomcat -d /opt/tomcat tomcat
Download latest Tomcat server of version 8.5 from Apache mirror.
wget http://www-us.apache.org/dist/tomcat/tomcat-8/v8.5.28/bin/apache-tomcat-8.5.28.tar.gzExtract the archive into /opt/tomcat directory.
mkdir /opt/tomcat
tar xvf apache-tomcat-8*.tar.gz -C /opt/tomcat --strip-components=1
Provide appropriate permissions and ownership to Tomcat server files.
cd /opt/tomcat
chgrp -R tomcat /opt/tomcat
chmod -R g+r conf
chmod g+x conf
chown -R tomcat webapps/ work/ temp/ logs/
Create a new systemd service file for managing Tomcat server.
nano /etc/systemd/system/tomcat.servicePopulate the file with the following configuration.
[Unit]
Description=Apache Tomcat Web Application Container
After=syslog.target network.target

[Service]
Type=forking
Environment=JAVA_HOME=/usr/lib/jvm/jre
Environment=CATALINA_PID=/opt/tomcat/temp/tomcat.pid
Environment=CATALINA_HOME=/opt/tomcat
Environment=CATALINA_BASE=/opt/tomcat
Environment='CATALINA_OPTS=-Xms512M -Xmx1024M -server -XX:+UseParallelGC'
Environment='JAVA_OPTS=-Djava.awt.headless=true -Djava.security.egd=file:/dev/./urandom'

ExecStart=/opt/tomcat/bin/startup.sh
ExecStop=/bin/kill -15 $MAINPID

User=tomcat
Group=tomca
tUMask=0007
RestartSec=10
Restart=always

[Install]
WantedBy=multi-user.target
Start the Tomcat server and enable it to automatically start at boot time.
systemctl start tomcat
systemctl enable tomcat
You can check if Tomcat is running by going to http://your-server-ip:8080 using your favourite web browser. You should see the default Tomcat page. If you are getting some error, then make sure that port “8080” is allowed in Security group rules.
Install Guacamole Client
Since we have installed the Tomcat server, download the Guacamole client binary file using the following command.
wget "http://apache.org/dyn/closer.cgi?action=download&filename=guacamole/0.9.14/binary/guacamole-0.9.14.war" -O guacamole-0.9.14.warMove the Guacamole client file to the Tomcat’s webapps directory.
mv guacamole-0.9.14.war /opt/tomcat/webapps/guacamole.warRestart the Tomcat server.
systemctl restart tomcatGuacamole client is now installed on your server, you can check if Guacamole client is working by going to http://your-server-ip:8080/guacamole using your favourite browser. You should see Guacamole login interface. You will not be able to log in yet as we have not configured authentication yet.
Setting Up Authentication
Guacamole client supports multiple authentication mechanisms such as file-based auth, database auth, OAuth, LDAP etc. In this section of the tutorial, we will configure database based authentication using MySQL database server.
Local Authentication
MySQL database will be used to store the authentication and other data. Since we do not require high performance and scalability which ApasaraDB provides, we will install MySQL server on the same instance.
Install MariaDB server which is an open source fork of MySQL.
yum -y install mariadb mariadb-serverStart the MariaDB server and enable it to automatically start at boot time.
systemctl start mariadb
systemctl enable mariadb
Set a password for the MySQL root user and secure the server instance by removing the test database and user.
mysql_secure_installationNow login to your MySQL shell using the root user and the password you just created.
mysql -u root -pRun the following queries to create a new database named guacdb along with guacdb-user having full access to the database. Please change StrongPassword to a very strong password.
CREATE DATABASE guacdb CHARACTER SET utf8 COLLATE utf8_general_ci;
CREATE USER 'guacdb-user'@'localhost' IDENTIFIED BY 'StrongPassword';
GRANT ALL PRIVILEGES ON guacdb.* TO 'guacdb-user'@'localhost';
FLUSH PRIVILEGES;
EXIT;
Configure Guacamole
Now that our database server is running, we need to install the MySQL connector and Guacamole JDBC auth plugin. Create the new directories to store the plugins.
mkdir -p /etc/guacamole/{extensions,lib}Download the MySQL connector extension from MySQL site.
cd /tmp
wget https://dev.mysql.com/get/Downloads/Connector-J/mysql-connector-java-5.1.45.tar.gz
Extract and move the MySQL connector into /etc/guacamole/lib.
tar xf mysql-connector-java-5.1.45.tar.gz
mv mysql-connector-java-5.*/mysql-connector-java-5.*.jar /etc/guacamole/lib/
Download the Guacamole JDBC authentication extension from Apache Guacamole site.
cd /tmp
wget "http://apache.org/dyn/closer.cgi?action=download&filename=guacamole/0.9.14/binary/guacamole-auth-jdbc-0.9.14.tar.gz" -O guacamole-auth-jdbc-0.9.14.tar.gz
Extract the archive and move the extension to /etc/guacamole/extensions directory.
tar xf guacamole-auth-jdbc-0.9.14.tar.gz
mv guacamole-auth-jdbc-0.9*/mysql/guacamole-auth-jdbc-mysql-0.9*.jar /etc/guacamole/extensions/
Since we have already created the database and database user, we can proceed to create the database schema and import the initial data. The schema is shipped along with the JDBC extension.
Import the SQL schema and initial data into the guacdb database using the following command. Provide the password of the MySQL root user when prompted.
cd guacamole-auth-jdbc-0.9*/mysql/schema
cat *.sql | mysql -u root -p guacdb
Create a new configuration file for Apache Guacamole so it can override the default configuration.
nano /etc/guacamole/guacamole.propertiesPopulate the file with the following configuration. Make sure to edit the StrongPassword with the actual password of guacdb-user.
# MySQL properties

mysql-hostname: localhost
mysql-port: 3306
mysql-database: guacdb
mysql-username: guacdb-user
mysql-password: StrongPassword
mysql-default-max-connections-per-user: 0
mysql-default-max-group-connections-per-user: 0
Set GUACAMOLE_HOME environment variable so that the Guacamole Server can read the configuration file and the extensions.
echo "export GUACAMOLE_HOME=/etc/guacamole" >> ~/.bash_profile
source ~/.bash_profile
Disable SELinux as it causes errors when running Guacamole.
sed -i 's/enforcing/disabled/g' /etc/selinux/config
setenforce 0
Restart Guacamole proxy daemon and Tomcat server so that the new configuration can take effect.
systemctl restart guacd
systemctl restart tomcat
Guacamole Client authentication is now configured on your server. You can check if you can log in by going to http://your-server-ip:8080/guacamole using your favourite browser. Log in using the default administrator user guacadmin and password guacadmin.
Setting up Nginx Reverse Proxy
Setting up a reverse proxy secured with SSL is recommended to encrypt the data exchanged between the browser and the Guacamole server. This will also map a domain name to your server so you won’t need to remember the IP address of the server.
Install Nginx web server.
yum -y install nginxStart the Nginx web server and enable it to automatically start at boot time.
systemctl start nginx
systemctl enable nginx
SSL Certificate
In this tutorial, we will use the certificates generated with Let’s Encrypt certificate authority. If you wish to use more production friendly certificates, you can purchase commercial certificates from Alibaba Cloud.
Download and install Certbot. Certbot is an official client application for Let’s Encrypt SSL generation.
wget https://dl.eff.org/certbot-auto -O /usr/bin/certbot
chmod a+x /usr/bin/certbot
Note: Before requesting SSL certificates, make sure that the domain you are using is pointed towards the IP address of the instance. If not, make an “A” type record in DNS management panel and point the domain or subdomain to the public IP address of your instance and wait for the DNS to propagate.
Generate Let’s Encrypt SSL certificates for your domain.
certbot certonly --webroot -w /usr/share/nginx/html -d guac.example.comReplace all occurrences of guac.example.com with your actual domain name. The above command will ask you for your email to send you renewal notices. If the certificates are generated successfully, you should get following output.
IMPORTANT NOTES:
 - Congratulations! Your certificate and chain have been saved at:
   /etc/letsencrypt/live/guac.example.com/fullchain.pem   Your key file has been saved at:
   /etc/letsencrypt/live/guac.example.com/privkey.pem   Your cert will expire on 2018-06-05. To obtain a new or tweaked
   version of this certificate in the future, simply run certbot
   again. To non-interactively renew *all* of your certificates, run
   "certbot renew"  ...
Auto-Renew Certificate
Create a cron job to renew the certificates as Let’s Encrypt certificates are expired in every three months.
{ crontab -l; echo '36 2 * * * /usr/bin/certbot renew --post-hook "systemctl reload nginx"'; } | crontab -The above command will run the renewal command every day at 2.36 AM. If the certificates are due for expiry it will automatically renew them.
Create a new server block configuration file for Guacamole web application reverse proxy.
nano /etc/nginx/conf.d/guacamole.confPopulate the file with the following configuration. Replace the example domain name with the actual one. Also, make sure that the path to the Let’s Encrypt SSL certificate and the private key is correct.
server {
    listen 80;
    server_name guac.example.com;
    return 301 https://$host$request_uri;
}
server {
    listen 443 ssl http2;
    server_name guac.example.com;
    root html;
    index index.html index.htm;
    ssl on;
    ssl_certificate         /etc/letsencrypt/live/guac.example.com/fullchain.pem;
    ssl_certificate_key     /etc/letsencrypt/live/guac.example.com/privkey.pem;
    ssl_session_cache    shared:SSL:10m;
    ssl_session_timeout    1440m;
    ssl_protocols  TLSv1 TLSv1.1 TLSv1.2;
    ssl_ciphers HIGH:!aNULL:!eNULL:!EXPORT:!CAMELLIA:!DES:!MD5:!PSK:!RC4;
    ssl_prefer_server_ciphers on;
    add_header Strict-Transport-Security "max-age=31536000; includeSubdomains;";

    access_log  /var/log/nginx/guacamole.access.log;
    location / {
    proxy_pass http://localhost:8080/guacamole/;
    proxy_buffering off;
    proxy_http_version 1.1;
    proxy_set_header X-Forwarded-For $proxy_add_x_forwarded_for;
    proxy_set_header Upgrade $http_upgrade;
    proxy_set_header Connection $http_connection;
    proxy_cookie_path /guacamole/ /;
    }
}
Check the Nginx configuration for errors.
nginx -tYou should see the following output if the configuration is error free.
nginx: the configuration file /etc/nginx/nginx.conf syntax is ok
nginx: configuration file /etc/nginx/nginx.conf test is successful
Restart Nginx web server to implement the changes in the configuration.
systemctl restart nginxNow you can go to https://guac.example.com to access the Guacamole dashboard. The connections to the server and the browser are also secured with SSL.
Connecting First Client
Guacamole server is now ready and working. You can add as many remote servers as you want. It can connect to the remote clients using SSH, Telnet, RDP, and VNC. To verify if it can connect to the remote server, let’s add our first SSH based connection.
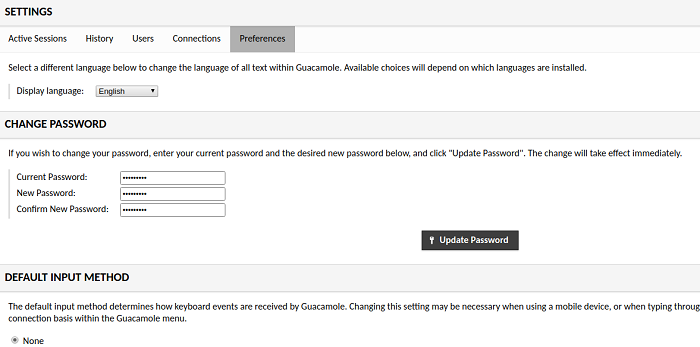
Change Default Password
Before proceeding further, let’s change the password of the default “guacamole” user. Login with default administrator user guacadmin and password guacadmin and go to the Preferences tab. Change the default password from this tab.
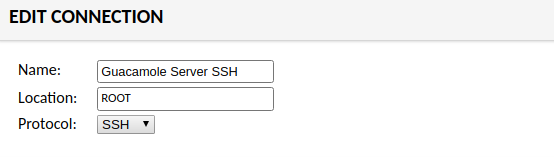
Add SSH Connection
To add a new connection, go to “Connections” tab and click on “Add new Connection” button. Provide a name for the connection and choose the protocol from drop down. Since I am connecting to the Guacamole server via SSH, I am selecting “SSH”.
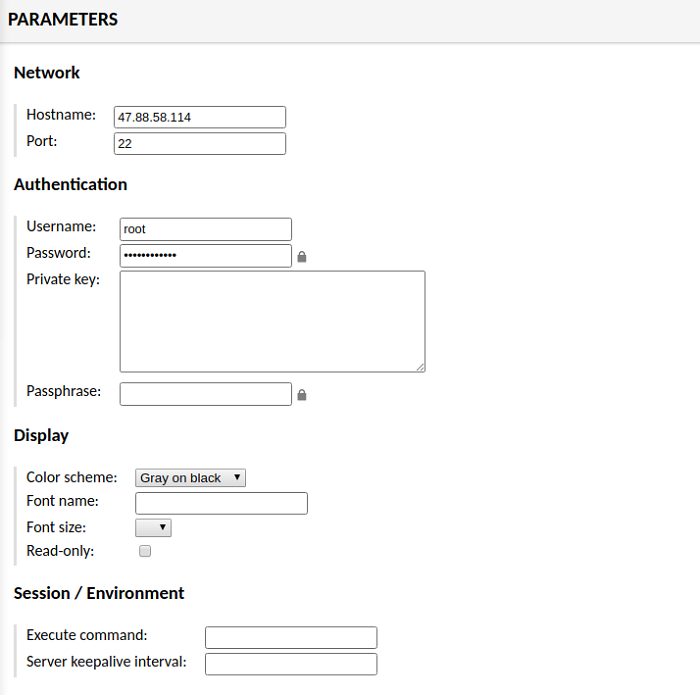
In “Parameters” provide the hostname of the target server and port. You also use “localhost” for connecting the same server. Provide the username and password, if connecting through private key than provide the contents of the private key. You can also configure the display, such as color scheme and fonts etc. Once you are done, click on “Save” button.
Test Connection
To connect to the SSH server you just added, go to the dashboard and it will automatically try to connect to the SSH when there is only a single connection is available. Once you are connected, you should see the following interface.
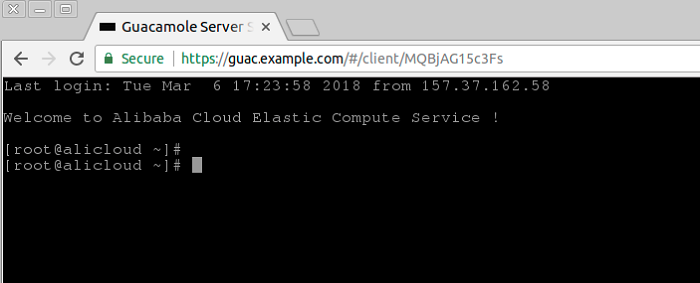
Similarly, you can add more SSH clients and graphical dashboards using various connection methods. The remote connections you want to add are not required to have either of Guacamole Server or Client, you can directly add them. Once you add the remote servers in Guacamole, you will only need a web browser to access them from anywhere in the world.
All links in a practical list


More articles
Using AI to Empower Cloud Architecture and Deployments
The integration of artificial intelligence (AI) into cloud infrastructure is revolutionizing how we manage and deploy cloud resources. AI, now a pivotal component, optimizes the entire lifecycle of cloud architecture, enhancing tasks like deployment, maintenance, and scaling. This article explores the role of AI in empowering cloud architecture and deployments, especially when combined with Infrastructure as Code (IaC) tools like Bicep and Terraform.
Bicep - Tags as Parameters
Deploying infrastructure ARM Templates to Azure, but using Tags and their respective value as the parameter configuration settings
In a post earlier, we look at using arm to lookup the value of tags’ at both the Subscription and Resource Level.
With Bicep this is much easier to understand. This is the same lab configuration as in the original post, but this time to code should be a lot more readable.

Streaming Vinyl On Sonos
Mixup some Vyinl Oldies, a little Ice to cast, and a PI for some energy, and your ready to go
A little known trivia - I was once a Disc Jokey, and spent a lot of my youth behind the decks, in clubs around the West Of Ireland. Today, I still am the proud owner of a very large collection of Vynil and CD music, which of course deserves to get a second life with my digital streaming audio system powered by Sonos

Azure IaC - Tags as Parameters
Deploying infrastructure ARM Templates to Azure, but using Tags and thier respective value as the parameter configuration settings
In the post, I am going to introduce a concept which will allow you to greatly up your Infrastructure as Code game, by using Azure as a State Machine!
One of the typical challenges when deploying ARM templates, is the sheer number of parameters which we find as a requirement to complete a deployment; which as you will appreciate gets considerably harder as we target many environments.

Change Detection Using Oxidized
Oxidized is a Linux based service which has the ability to monitor a device’s configuration, including software and hardware. Current configuration is backed up from each device and stored to a GIT repository to maintain history of changes.
The process is very simple:
- Login to each device in the router list
router.db, - Run Commands to get the information that will be saved
- Clean the output
- Commit the Changes to GIT Repository
The tool is coded in Ruby, and implements a Domain Specific Language (DSL) for interaction.